
Short answer: a blurry Short usually comes from a handful of causes. YouTube may not have finished making the HD version, your own phone may be playing it in a low-quality mode, your export bitrate may be too low, the file may have been compressed too often, or the editor preview may be fooling you. You can tell which one in about ten minutes, and each has a different fix.
Creators on Reddit and the YouTube Help Community ask this all the time, usually with “I exported in 1080p, so why does it look like 360p?” The replies are mostly guesses. Here is a test order instead. I checked the YouTube and CapCut help pages on October 27, 2026, and tested the commands on a sample vertical clip.
Step 1: Find Out Which Problem You Really Have
| What you see | Most likely cause | Go to |
|---|---|---|
| Blurry only in the first hour after upload | YouTube still processing HD | Reason 1 |
| Blurry on your phone, sharp on a friend’s phone or laptop | Your playback setting or weak network | Reason 2 |
| Blurry everywhere, even after a day | Low export bitrate or wrong settings | Reason 3 |
| Looks sharp in the editor, soft after upload | Editor preview or double compression | Reasons 4 and 5 |
| Sharp in the editor, soft in the exported file itself | Export settings or heavy zoom | Reason 3 and 5 |
The second row matters most. If the Short looks fine on another phone or on a laptop with good Wi-Fi, your video is fine and only your own playback is weak, which is common in towns where 4G drops indoors.
Reason 1: YouTube Is Still Processing the HD Version
When a video is uploaded, YouTube first makes a low-quality copy so that you can finish publishing quickly. The sharper versions arrive later. Google says higher resolutions and higher frame rates take longer, and that your video may look soft for several hours. A 4K, 60 fps upload takes longer than a 1080p, 30 fps one.
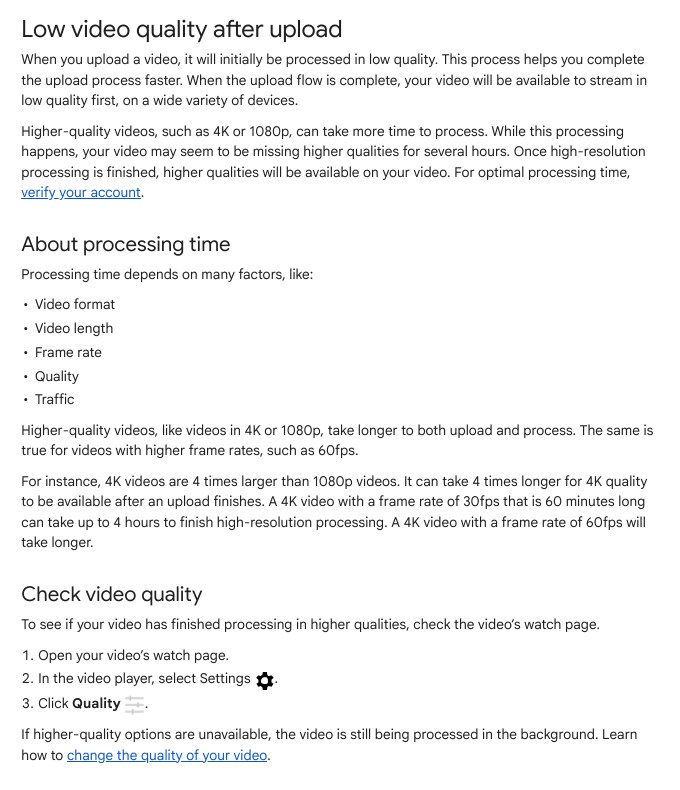
So the first fix is just time. Open your Short and look at the quality menu. If only low options like 144p or 360p appear, processing is not done. Check again after a few hours. Google also says that verifying your account helps with processing time, so if your channel is not verified yet, do that once.
Do not re-upload in panic
A re-upload restarts processing and throws away the views and comments already on the Short. Wait a few hours, then judge.
Reason 2: Your Own Phone Is Playing It in Low Quality
YouTube changes the quality of what you watch depending on your network, your screen and your settings. On the default Auto setting, a Short can start in a low-quality version and stay there on a slow or busy connection. Many creators report that Shorts look worse than normal videos on their own phones even though the uploaded file is fine.
The quality options on Android are Auto, Higher picture quality, Data saver and Advanced. Higher picture quality uses more mobile data and can make videos start slower, so be careful if you are on a 1.5 GB per day plan.
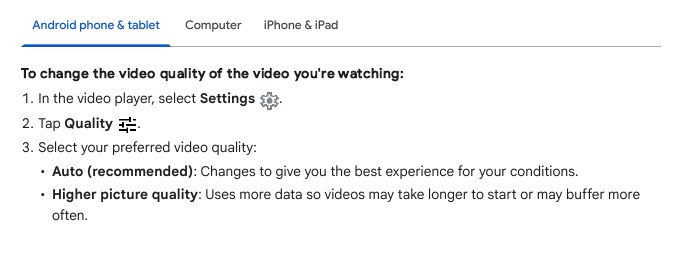
To change it for every video on your phone, follow this path in the YouTube app:
- Tap your profile picture at the bottom right.
- Tap Settings, then Video quality preferences.
- Under both On mobile networks and On Wi-Fi, choose Higher picture quality.
- Close the app fully, open it again and play your Short on Wi-Fi.
To see the real picture, open the Short as a normal watch page on a computer with https://www.youtube.com/watch?v=VIDEO_ID. The full player lists every quality that has finished processing.
Reason 3: Your Export Bitrate Is Too Low
Resolution is only half the story. A 1080×1920 video at a very low bitrate has the right number of pixels but not enough data to describe them, so faces turn waxy and text gets fuzzy. This is the most common reason for a Short that is blurry even after a full day.
YouTube gives reference bitrates for uploads. These are recommendations, not limits, and they are for a normal 16:9 frame, but the pixel count of a 9:16 Short at 1080×1920 is the same, so the numbers are a good guide.
| Resolution | 30 fps (Mbps) | 60 fps (Mbps) |
|---|---|---|
| 720p | 5 | 7.5 |
| 1080p | 8 | 12 |
| 1440p | 16 | 24 |
| 2160p (4K) | 35 to 45 | 53 to 68 |
Many free apps default to far lower numbers to keep files small. In CapCut, open Export and check Resolution, Frame rate and the bitrate option before the final tap. CapCut Help says to set Bit rate to Custom and type a value in Kbps. For 1080p at 30 fps I would enter about 10,000 Kbps, and more for sports or dance. That is my own choice, a little above YouTube’s 8 Mbps reference, because a Short gets compressed again.
Check Your File Before You Upload
You do not have to guess what your editor produced. If you have a laptop, the free tool ffprobe (part of FFmpeg) reads the real numbers from the file. Send the exported file to the laptop as a document or through a cable, not through a chat app, then run this:
ffprobe -v error -select_streams v:0 -show_entries stream=codec_name,profile,width,height,r_frame_rate,bit_rate,pix_fmt -of default=nw=1 myshort.mp4You want to see codec_name=h264, width=1080, height=1920 and a bit_rate close to your target. If the bit_rate shows only 2 or 3 million, your export settings are the cause.
If you cannot re-export from the editor, this command rebuilds the file with YouTube’s recommended settings (H.264 High profile, 4:2:0, BT.709 colours, AAC audio at 48 kHz, fast-start MP4). I ran it on a 1080×1920 test clip, and ffprobe confirmed H.264 High, yuv420p, bt709, 30 fps and a bitrate of about 10 Mbps. It cannot add detail that is missing from the source, so it only helps if the problem was the format, not the footage.
ffmpeg -i myshort.mp4 -c:v libx264 -profile:v high -preset slow \
  -b:v 10M -maxrate 12M -bufsize 20M -pix_fmt yuv420p \
  -color_primaries bt709 -color_trc bt709 -colorspace bt709 \
  -r 30 -c:a aac -b:a 384k -ar 48000 -movflags +faststart short_final.mp4
Change -r 30 to match how you recorded. YouTube asks creators to upload in the same frame rate as the original, so do not force 60 fps on a 30 fps clip.
Reason 4: The Video Was Compressed Twice or Three Times
Every compression step throws a little detail away, and the damage adds up. A very common Indian workflow goes like this: edit on the phone, send the video to yourself on WhatsApp so it can be uploaded from the laptop, then upload. WhatsApp shrinks videos when you send them as normal media, so YouTube then compresses a file that is already degraded.
- Upload straight from the phone’s gallery or from the YouTube app when you can.
- If you must move the file, use a USB cable, Google Drive’s download button, or WhatsApp’s Document option, which sends the original file.
- Keep one master export, and make each platform copy from the master, not from another copy.
Reason 5: The Editor Preview or a Heavy Zoom Is Fooling You
Sometimes the export is fine and only the preview was soft. CapCut says the editor preview runs at lower quality for smooth playback, while the export keeps the source quality. On CapCut PC, Menu > Settings > Performance > Proxy can be turned off for a more honest preview. Always judge the exported file in your gallery or on a laptop.
One real cause hides here too: CapCut sets the timeline to match your first clip. Start with your sharpest clip, and avoid zooming past 100 percent, which stretches pixels.
Reason 6: Wrong Size, Frame Rate or Padding
The vertical match for 1080p is 1080×1920 (9:16). Google also says not to bake black bars or padding into the video. A wide 16:9 clip placed inside a 9:16 frame with blurred bars may leave only a thin sharp strip, so film or crop vertically.
My Ten-Minute Routine Before Every Short
- Edit with your sharpest clip first, so the timeline takes the right size.
- In Export, choose 1080p, pick the right frame rate and set a custom bit rate near 10,000 Kbps.
- Watch the exported file in your gallery, not in the editor, and move it without a chat app compressing it.
- Upload, wait a few hours, then check on a second phone and a laptop.
Test once, then reuse
Export one 15-second clip at 5,000, 10,000 and 15,000 Kbps and upload all three as unlisted videos. Compare them next day and keep the lowest number that looks clean.
If It Is Still Blurry
- Only the first few seconds are soft: this is normal adaptive quality. Play the Short again on Wi-Fi with Higher picture quality set.
- Text and thin lines look fuzzy: raise bitrate and keep captions large and bold. Dark night scenes also need more bitrate than bright ones.
- Nothing works: post the details in the YouTube Help Community with your export settings and the ffprobe output. Specific numbers get better answers than “my Short is blurry”.
Common Mistakes
- Judging quality ten minutes after upload.
- Sending the finished file through WhatsApp before uploading it.
- Blaming YouTube without checking the file with ffprobe or on a second device.
Frequently Asked Questions
How long until a Short shows HD?
Google gives no exact time. It says higher resolutions can take several hours. For a short 1080p clip, waiting a few hours is a sensible rule.
Does YouTube always lower the quality of my Short?
YouTube re-encodes every upload, so it is never an exact copy. A good export with enough bitrate still looks sharp afterwards.
Should I export in 4K for Shorts?
Only if the footage is really 4K. A clean 1080×1920 export beats a stretched 4K file.
Is a higher bitrate always better?
No. Past a point, extra data only adds file size. YouTube’s reference for 1080p at 30 fps is 8 Mbps.
Sources & Documentation
- YouTube Help: Low video quality after upload
- YouTube Help: Recommended upload encoding settings
- YouTube Help: Video resolution and aspect ratios
- YouTube Help: Change the quality of your video
- CapCut Help: Why does the video quality change after exporting
- CapCut Help: How do I fix blurry videos after importing
This guide was checked on October 27, 2026. App menus and help pages change, so the labels you see may differ slightly.
Written & Verified by Sampath Anji
Sampath Anji is a technology researcher, systems developer, and digital creator based in Telangana, India. He specializes in on-device AI architectures, autonomous agent workflows, high-throughput inference engines, and digital media production. Every tutorial on ISMARTANJI CREATIONS is grounded in code reproducibility, verified documentation, and transparent test environments. Read our full testing methodology on our About Us page, or submit feedback and code updates via our Contact Desk.