
Short answer: the "Upload at highest quality" switch only controls what your phone sends to Instagram. It does not control what your viewers receive. Instagram re-compresses every Reel on its own servers, and a new Reel often plays in a lighter version for the first day or two. So turn the switch on, export a clean 1080 x 1920 file, and then judge the Reel after it has had some views.
This is one of the most repeated questions from Indian creators who edit in CapCut, VN or InShot. One r/VideoEditing thread describes the exact case: 1080p, 30 fps, highest quality ticked, Wi-Fi only, and the Reel still looked bad. Replies in threads like this are mostly "export higher", which is not the fix. Below is what I could verify.
Why a sharp file turns soft on Instagram
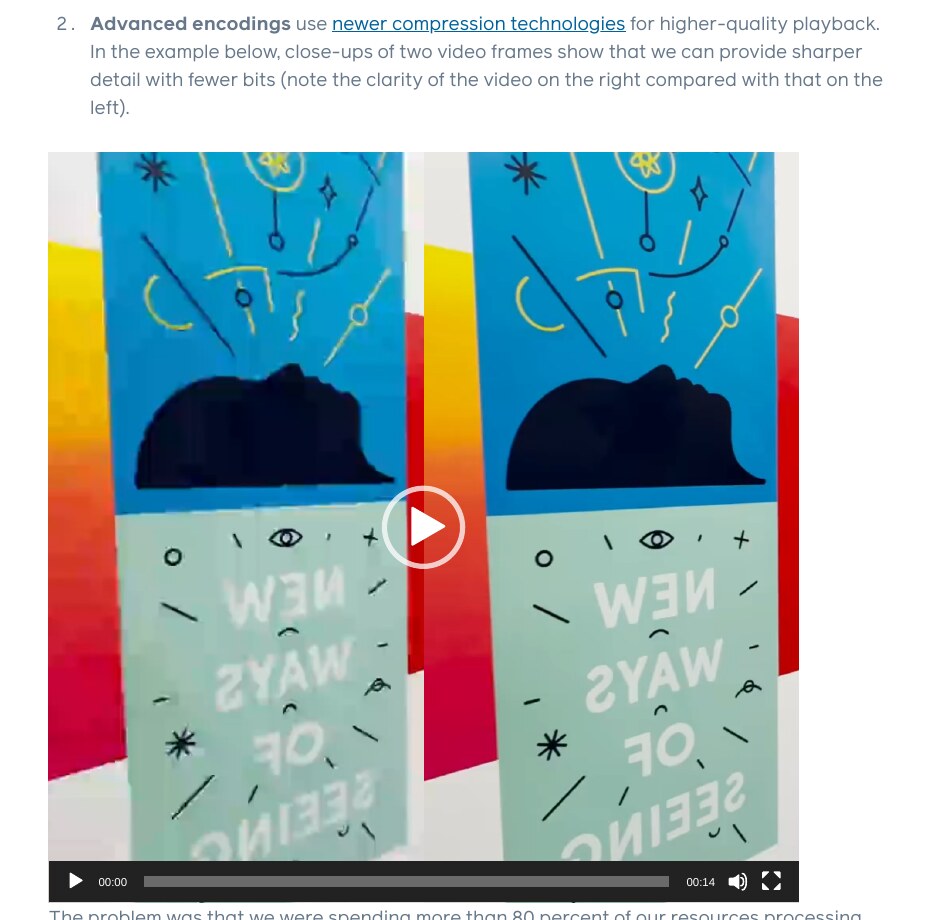
Think of Instagram as a second editor that works after you press Share. Your 1080p file, often 10 to 20 Mbps out of an editing app, is only the raw material. Instagram makes its own smaller copies and picks one for each viewer based on screen, network and settings. Meta’s engineers say they build two kinds of copies: basic ones that work on every phone, and advanced ones that use newer compression and look sharper at fewer bits. You can read this on the Meta Engineering page below.
A help article from a scheduling tool, Sequence, measured one Reel. The export was about 19 Mbps. The day after posting, Instagram was showing it at 720 x 1280 and about 0.6 Mbps. Older Reels on the same account played at 1080 x 1920 and 0.65 to 0.9 Mbps. That is one account, not a rule, but it shows the size of the squeeze: your file loses most of its data whatever you do. The same page says Instagram has stated that it puts more processing into videos that get more views, and may lower quality on old videos that few people watch.
So there are three separate causes, and people mix them up:
- Your export is weak: wrong size, low frame rate, HDR colours, tiny text.
- Your phone sent a reduced file: the high quality switch is off, or got reset.
- Instagram is playing its basic copy: new Reel, few views, slow network or data saver.
The first two you can fix today. The third mostly needs time, and a little planning.
Fix 1: Turn the highest quality switch on, and check it again
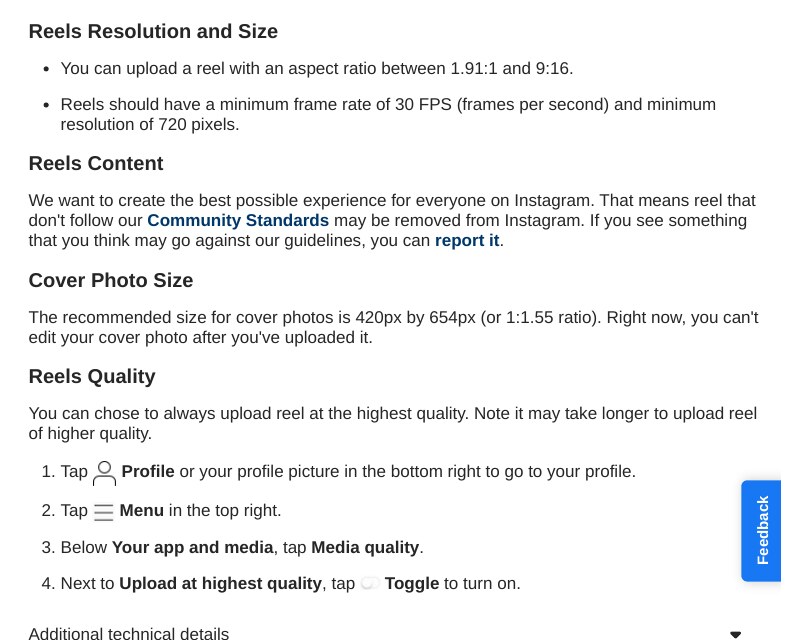
Instagram’s Help page gives this path. Do it once, then look again after every app update or reinstall. Several third-party guides say the switch goes back to off after you delete the app. I could not find that in Instagram’s own text, so treat it as a habit worth having, not a confirmed rule.
- Open Instagram and tap your profile picture at the bottom right.
- Tap the menu (three lines) at the top right.
- Under Your app and media, tap Media quality.
- Turn on Upload at highest quality.
Menu names move around
Instagram changes menu labels between versions. Older guides say Settings, then Account, then Data usage. If you do not see Media quality, use the search icon inside Settings and type "quality". The wording is the same on Android phones from any brand, because it is the app, not the phone.
Instagram says higher quality uploads can take longer. On a slow connection, wait for the upload bar to finish rather than closing the app.
Fix 2: Export the right file
Here is a surprise: Instagram’s Help page does not say 1080 x 1920. It gives minimums: an aspect ratio between 1.91:1 and 9:16, at least 30 FPS and at least 720 pixels. A site that compared Instagram’s three official spec pages (app, API and ads) makes the same point. Still, 1080 x 1920 at 9:16 is the sensible choice, because it is full HD for a vertical phone screen and well above the minimum.
| Setting | What to use | Why |
|---|---|---|
| Size | 1080 x 1920, 9:16 | Fills the screen, above the 720 minimum |
| Frame rate | 30 fps | Instagram’s stated minimum is 30; 60 fps adds data that gets squeezed anyway |
| Codec | H.264 in MP4, AAC audio | Plays on every phone and tool |
| Colour | SDR (Rec.709), not HDR | Phone HDR can shift colour or brightness on conversion, per the Sequence page |
| 4K export | Not needed | The Sequence page says 4K does not reach viewers at higher resolution |
If your editing app does not give enough control, convert the file on a laptop with FFmpeg. This command was tested in my sandbox: it produced an H.264, 1080 x 1920, 30 fps MP4 with AAC audio from a 4K 60 fps test clip. Change the file names to yours.
ffmpeg -i input.mp4 -vf "scale=1080:1920:flags=lanczos,fps=30,format=yuv420p" -c:v libx264 -preset slow -crf 18 -profile:v high -c:a aac -b:a 192k -ar 48000 -ac 2 -movflags +faststart reel.mp4CRF 18 keeps a lot of detail. If the file comes out very large, move to CRF 20. A very small file is not the goal: more detail going in gives Instagram’s compressor better material to work with.
Fix 3: Make the image easy to compress
Compression hurts three things most: small text, fast motion, and fine texture like grass, hair or a busy shirt. Real situations I see from Indian creators: a Telugu or Hindi subtitle in a thin font at the bottom, a cricket-ground clip with a moving crowd, or a street vlog with heavy shaking. Those frames eat the data budget first.
- Use bold, large subtitles with a solid shadow or box behind them.
- Keep text well inside the frame, away from the edges and the caption area.
- Avoid heavy "sharpen" filters. They add noise, and noise is expensive for compression, so the sharpened Reel can end up looking worse.
- Use a tripod or a stabilised mode for shaky shots. Smooth video compresses better.
Fix 4: Finish the edit in one place
Many Reels go through three apps: shoot, edit in CapCut, then add trending audio inside Instagram. Every stage that re-saves the video can add one more round of compression. I could not find Instagram stating this for in-app music, so take it as a cautious tip, not a proven cause. If your app can add the music you want, do it there and export once. Then upload the finished file without opening Instagram’s editor again unless you need to.
Be careful with the phone’s own camera mode
If your phone records in HDR or a high-efficiency format, switch that off for Reels shoots and record in standard colour. The colour shift Sequence describes comes from converting HDR footage, and you can avoid it before you even start editing.
Fix 5: Wait a day, then judge
This is the step most people skip. A new Reel may start with a lighter version while sharper ones are prepared later. Meta publishes no timeline. So open your Reel on a phone over good Wi-Fi after a day or two, once it has had some views, and compare it to your export.
Do not delete and repost to "fix" quality. The Sequence page warns that the new post goes through the same processing from the start and loses the views the first one earned. In my view, only repost if the file itself was wrong, such as a bad crop or wrong frame rate.
Fix 6: Check how you are watching
The same Reel looks different on two phones. Instagram lowers playback quality on slow connections and when data saving is on. Many Indian users watch on mobile data in crowded areas, so a Reel can look soft to them, even when the same Reel looks fine on your home Wi-Fi.
- Open your Reel on Wi-Fi and look at it again.
- Check whether data saving is on in the phone you are watching on.
- Ask a friend on a different phone and network to compare.
Common Mistakes
- Exporting 4K and expecting a sharper Reel. It gets reduced anyway.
- Exporting 60 fps and 40 Mbps "to be safe". More data in does not mean more data out.
- Judging quality in the first hour after posting.
- Deleting and reposting again and again.
- Using thin fonts and tiny subtitles.
- Forgetting that the high quality switch is only on your own phone.
Frequently Asked Questions
Does Upload at highest quality make the Reel look sharper to viewers?
It makes sure your phone sends a better file. It does not stop Instagram from compressing the Reel afterwards. The Sequence page also notes it only covers uploads made from that phone.
What is the best resolution for Instagram Reels?
Instagram’s Help page gives a minimum of 720 pixels, not a best size. 1080 x 1920 at 9:16 is the common, safe choice.
Does the Edits app or CapCut give better quality?
I could not find a fair test that proves one app beats another, so I will not claim it. What matters most is the export settings and the number of times the file is re-saved.
Why do my old Reels look worse than new ones?
Instagram has said it can lower quality on older videos that few people watch, according to the Sequence page. Meta has also said it spends more processing on videos that get more views.
Sources & Documentation
- Instagram Help Center: Reel size and aspect ratios, Reels Quality steps
- Meta Engineering: how Instagram makes basic and advanced video encodings
- Sequence Help: Instagram video quality after publishing
- Clapr: what Instagram’s official Reels specs actually say
Checked on 2 November 2026. Menus and limits change with app updates, so confirm on Instagram’s Help page.
Written & Verified by Sampath Anji
Sampath Anji is a technology researcher, systems developer, and digital creator based in Telangana, India. He specializes in on-device AI architectures, autonomous agent workflows, high-throughput inference engines, and digital media production. Every tutorial on ISMARTANJI CREATIONS is grounded in code reproducibility, verified documentation, and transparent test environments. Read our full testing methodology on our About Us page, or submit feedback and code updates via our Contact Desk.